Getting Started: Manage Businesses Screen
Before you can track income and expenses, you need to add your additional self-employment businesses.
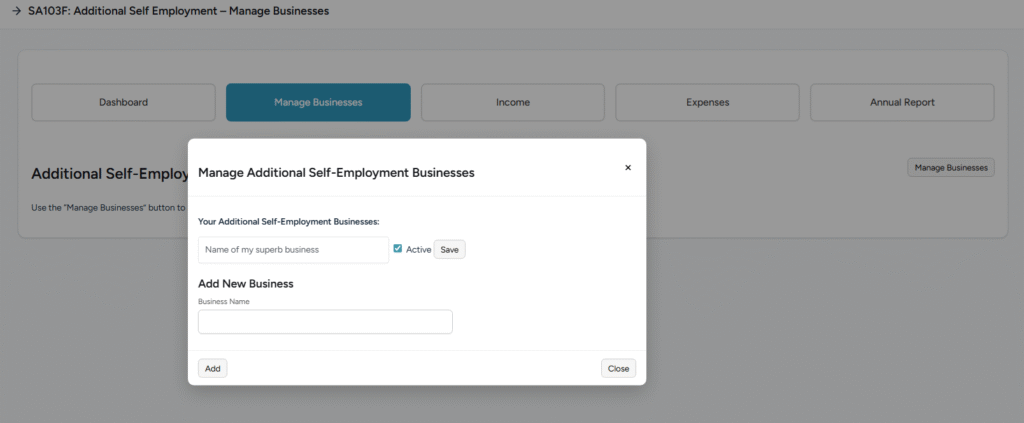
To add a new business:
- Navigate to the “Manage Businesses” page using the button menu
- Click the “Manage Businesses” button to open the management modal
- Scroll to “Add New Business” section at the bottom
- Enter your business name in the “Business Name” field
- Click “Add”
- Your business will appear in the list above

To edit a business:
- Open the “Manage Businesses” modal
- Find your business in the list
- Update the business name in the text field if needed
- Check/uncheck the “Active” checkbox to activate or deactivate
- Click “Save” next to that business
Important notes:
- Maximum of 5 additional self-employment businesses allowed
- Only active businesses appear in income/expenses dropdowns
- Businesses cannot be deleted (only deactivated) to preserve historical records
- Deactivating a business hides it from new entries but doesn’t affect existing records
Recording Income
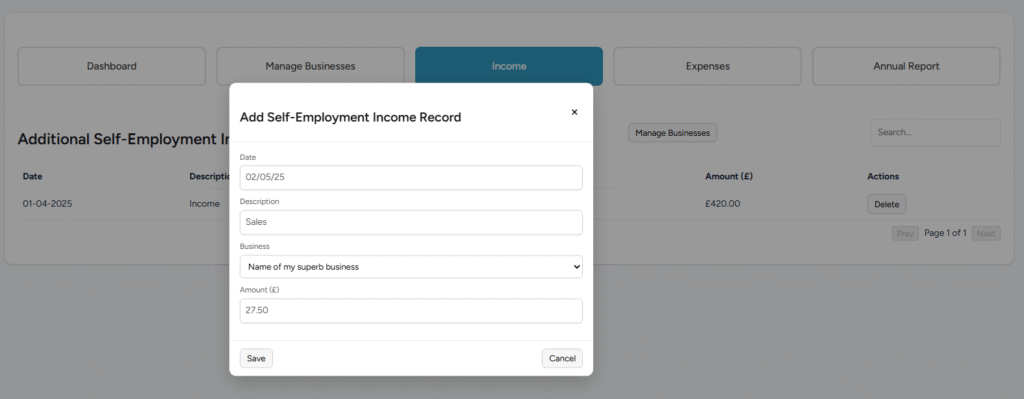
To add an income transaction:
- Click “Add new” button in the top right
- Fill in all required fields:
- Date: Enter as DD-MM-YYYY (e.g., 15-06-2025) or DD/MM/YY (e.g., 15/06/25)
- Description: Brief explanation of the income source
- Business: Select from dropdown (only active businesses shown)
- Amount (£): Enter in pounds and pence (e.g., 1500.00)
- Click “Save”

The income table shows:
- Date in DD-MM-YYYY format
- Description of the income
- Which business it relates to
- Amount in £ with 2 decimal places
- Actions column with “Delete” button

Managing income records:
- Search: Type in the search box to filter by description
- Pagination: Use “Prev” and “Next” buttons to navigate pages
- Delete: Archives the record (soft delete – can be restored by administrators)
- Sorting: Most recent transactions appear first
Recording Expenses
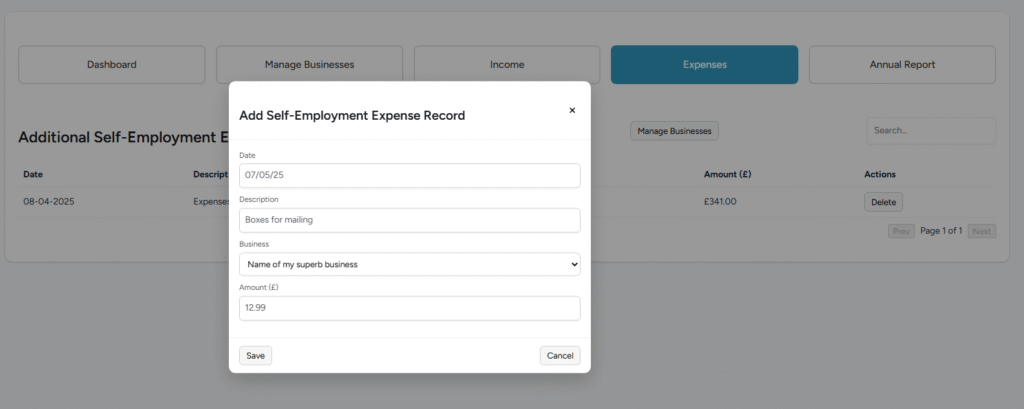
To add an expense transaction:
- Click “Add new” button in the top right
- Complete the required fields:
- Date: Enter as DD-MM-YYYY (e.g., 15-06-2025) or DD/MM/YY (e.g., 15/06/25)
- Description: What the expense was for
- Business: Select from dropdown (only active businesses shown)
- Amount (£): Enter in pounds and pence (e.g., 45.50)
- Click “Save”

The expenses table shows:
- Date in DD-MM-YYYY format
- Description of the expense
- Which business it relates to
- Amount in £ with 2 decimal places
- Actions column with “Delete” button

Managing expense records:
- Search: Type in the search box to filter by description
- Pagination: Use “Prev” and “Next” buttons to navigate through records
- Delete: Archives the record (can be restored by administrators if needed)
- Sorting: Most recent expenses appear first
Viewing the Annual Report
The Annual Report provides a comprehensive overview of your additional self-employment performance for the relevant tax year.
What the report shows:
For each business (shown separately):
- Business name with status indicator (Active/Inactive)
- Monthly breakdown table with columns for each month (Apr 2025 – Mar 2026)
- Income row: Total income per month
- Expenses row: Total expenses per month
- Profit/Loss row: Calculated automatically (Income – Expenses)
- Total column: Year-to-date totals on the right

Overall Summary section:
- Combined totals across ALL businesses
- Total Income (all businesses combined)
- Total Expenses (all businesses combined)
- Overall Profit/Loss (highlighted in blue border)
- Color coding:
- Green background for income
- Red background for expenses
- Yellow background for profit/loss rows
- Red text for losses, green text for profits
How to use the report:
- Click “Annual Report” in the button menu
- Review each business’s performance individually
- Check the Overall Summary at the bottom for your combined position
- Use this information for tax planning and business decisions
- Print or save the page for your records
